
Ombre Style Manicure

 Ombre Style is basically making a gradient on your nail. You're just taking 2-4 colors of polish and sponging them onto your nail. You can use tape to make clean-up easier, but I found it tedious to put the tape on. The first time I did it I used a make-up sponge and layered the colors onto a paper. Then took the sponge dabbed the polish and pressed it onto my nails. Don't worry about the unevenness of the polish as the top coat will take care of that. Practice makes perfect and while my first time looked rough, I did notice it got better the more times I did it.


 Ombre Style is basically making a gradient on your nail. You're just taking 2-4 colors of polish and sponging them onto your nail. You can use tape to make clean-up easier, but I found it tedious to put the tape on. The first time I did it I used a make-up sponge and layered the colors onto a paper. Then took the sponge dabbed the polish and pressed it onto my nails. Don't worry about the unevenness of the polish as the top coat will take care of that. Practice makes perfect and while my first time looked rough, I did notice it got better the more times I did it.
Now while I was cruising pinterest I came across another way of doing this and found it so much easier! Essentially no clean up and I got the same effect as I did using a sponge. The big plus about this is you have more control over how the look ends up.

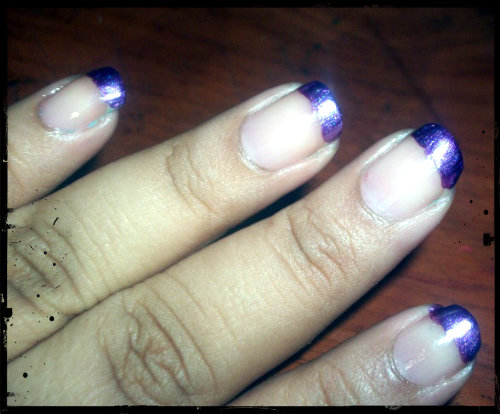
So I went with purple because I got a new purple glitter polish from Milani. I had a vision in my mind about what I wanted so I went for it. I grabbed a nail polish that I got from a great friend. It was a nice deep dark purple that worked perfectly. For the second polish I used a Sally Hansen polish that was sheer purple. It is very important that the second polish be a sheer one. That way the more you put on the darker it gets which will lead to a more smooth gradient. You can choose a third color that is even lighter, but it isn't required. I ended up not using the LA Colors polish because it was too pink. Last is totally optional and doesn't even really even go with the gradient style. I got a Milani glitter that I just loved! It is filled with big purple hex glitter and looked fantastic with the gradient. So ya'll ready...yea I am too!
Step 1:
Take your darkest shade and paint the tips of your nails. It doesn't have to be perfect so don't worry about that. It will get covered by the second coat so you'll be good, promise! You can put a second coat if needed, but it shouldn't need it.

Step 2:
Take the second shade, the sheer one, and go just below the tip. You want to make sure that there isn't a lot on the brush because you want it to still be sheer.

Step 3:
Take the same shade as in step 2 and repeat the process. You'll do the same process again if needed but the very bottom of your nail needs to be almost transparent.

Step 4:
For me I added a step 4 which was some glitter. I mean look at it, doesn't it look great?! I thought that it just added that little bit of oomph to my mani.
So what do you guys think? Are you going to try it out for yourself? Have you already tried it out and if so I'd love to see it! Feel free to post on my page Infinite Dreams Reviews Facebook Page. Who knows maybe someone will take home something sweet.
Nice Job!
ReplyDelete